Last Updated on October 24, 2026 by Umar Farooq
Mould in kitchen cupboards almost always comes from one of three things: a slow leak under the sink, steam that settles on cold cupboard walls, or air that never moves inside a closed box. Scrubbing the black spots without finding which one it is just resets the clock.
A kitchen cupboard is a small closed box next to a water supply, a kettle and a hob. It is the one place in the house where you store food, and the one place where nobody looks for months.

Why mould in kitchen cupboards shows up under the sink and on outside walls
The cupboards that go first are the sink unit and any run of units on an outside wall. The reasons are different, so it is worth knowing which one you have.
The sink unit gets water from below. A weeping joint rarely drips. It dampens the cupboard floor, which is often chipboard, and the damp stays because the doors are shut. The EPA’s mould guide puts the order of events plainly: moisture control is the key to mould control, and wet materials should be dried within 24 to 48 hours. A leak that has been seeping for months has had no such deadline.
Wall units get water from the air. Kettle and hob steam drifts up and meets the coldest surface in reach. The UK government’s damp and mould guidance notes that condensation forms on cold surfaces, including behind furniture. A cupboard back panel against an outside wall is exactly that. I cover where the steam goes in how to reduce humidity in a kitchen, and whether cooking alone can be blamed in does cooking cause damp.
Shut doors keep it all in. Packed shelves and closed doors mean any moisture that gets in stays in. It is the same trap as a fitted wardrobe, and I explain the airflow side in mould in the wardrobe.
A quick sorting rule, which is my own rule of thumb rather than a measured one: mould on the floor and back corner of the sink unit points to water; mould on the upper back panel of a wall unit points to steam and a cold wall.
Test for a slow leak before you clean anything
Empty the sink cupboard first. Then run the test below with the tap on and the plug out, and again with the sink full and released.
Turn off the isolating valve before you touch any pipe or joint, and do not open a cupboard that has water pooling near a socket, a dishwasher plug or a waste disposal unit until the power to it is off. If you cannot stop a leak, call a plumber. Never mix cleaning products.
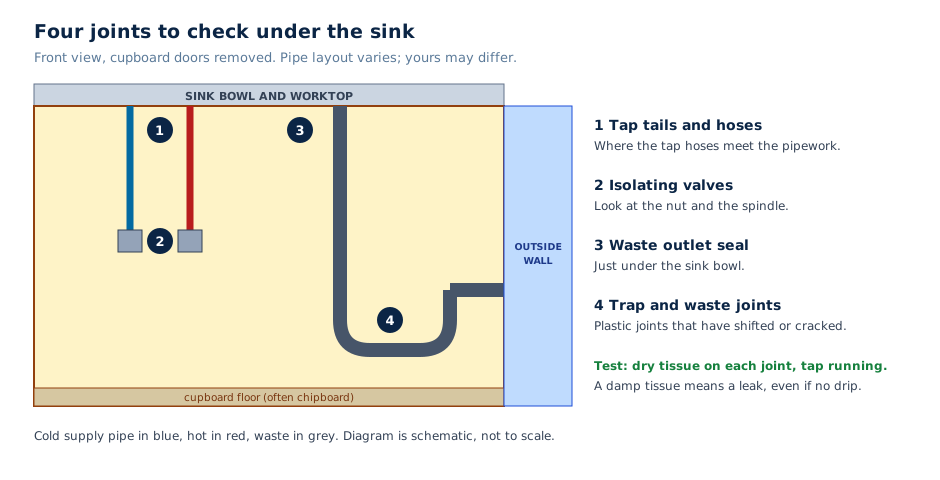
- Wipe each joint dry, then hold a dry tissue against it while the tap runs. A tissue that goes dark tells you more than your eyes do.
- Run your finger along the underside of the pipes. Moisture collects where a joint meets a nut or a rubber seal, and it drips from the lowest point.
- Look for a white or green crust on metal fittings, or a stained, swollen cupboard floor. Those are signs of long-term seepage.
- Check the neighbours. A dishwasher or washing machine hose in the same unit counts as a joint too.
- Smell the cupboard. A damp, earthy smell without visible mould still says moisture is sitting there.
If the tissue stays dry and the mould is on a wall unit, the cause is steam and a cold surface rather than plumbing. If you find a leak you cannot fix with a tightened nut, it is a plumber’s job, not a dehumidifier’s.
Dry it out, then decide what to throw away
Fix the water first. Cleaning before the source is sorted only gets you a clean cupboard that is damp again next month.
Wear gloves, a mask and goggles without vent holes. Do not dry-brush or vacuum visible mould, and do not point a fan at it, because that moves spores around the kitchen. Do not use bleach or strong chemicals on any surface that touches food.
The EPA says a mouldy area smaller than about 10 square feet (roughly 1 square metre) can usually be handled yourself, and that hard, non-porous surfaces can be scrubbed with detergent and water and dried completely. Kitchen cupboards usually fall inside that limit, so here is the sequence I would follow.
- Empty the cupboard and put the contents somewhere dry. Throw away open packets, paper bags and cardboard that show mould; they are porous and cannot be cleaned.
- Wash tins, bottles and crockery that are intact in hot soapy water.
- Scrub laminated or painted surfaces with detergent and water, then dry them fully with a cloth.
- Leave the doors open for a day or two so the carcass dries.
- Judge the board honestly. The EPA notes that absorbent materials may have to be thrown away if they get mouldy. Swollen or crumbling chipboard that has been wet for a long time will not clean up, and replacing the panel or the floor is cheaper than cleaning it for the fourth time. That is my judgement, not a test result.
Stop and get help if the patch is much bigger than a square metre, runs into the wall behind, or follows water you cannot trace. If you want to know how quickly the situation changes once materials are wet, how long mould takes to grow covers the detail.
Leave a gap, open the doors and stop steam reaching the shelves
Once it is dry and clean, the aim is to keep the box from turning back into an incubator.
- Leave 2 to 3 cm (about 1 inch) behind stored items on outside-wall units, so air can reach the back panel. This is my practical rule; it is not a standard.
- Do not cram the shelves. A slightly packed cupboard is better than a fully packed one.
- Never put away a damp cloth, sponge or tea towel. It is the easiest moisture to remove.
- Run the extractor fan or open a window while cooking and for ten minutes afterwards. Use a hood that vents outside; one that only filters recirculates the steam. The house-wide prevention guide covers the rest of the building.
- Check under the sink once a month. Run a hand along the pipes. It takes thirty seconds, and it is the cheapest insurance in the kitchen.
- Watch the room humidity. The EPA advises keeping indoor humidity below 60%, ideally between 30 and 50%. A cheap hygrometer in the kitchen tells you whether it is the room or just the cupboard.
If the hygrometer is high all winter, a dehumidifier in the next room can help, but it will not cure a leaking joint or a cold wall.
A dry cupboard needs a tight joint and a gap, not a stronger spray
Mould in kitchen cupboards is a moisture problem that looks like a cleaning problem. Find the leak or the steam, dry the box, throw away what is porous, and leave air a way in. After that, a monthly feel of the pipes is all the maintenance it needs.
FAQ
What causes mould in kitchen cupboards?
Moisture and still air. The most common sources are a leaking joint in the sink unit, cooking steam condensing on a cold outside wall, and damp items put away in a closed cupboard.
How do I know if there is a leak under my kitchen sink?
Wipe the joints dry, run the tap, and hold a dry tissue against each connection. A damp tissue, a crusty fitting or a swollen cupboard floor means a leak, even without a visible drip.
Can I clean mould out of a kitchen cupboard myself?
Usually yes. The EPA says areas under about 10 square feet can generally be handled by the householder: scrub hard surfaces with detergent and water, dry completely, and throw away porous items. Fix the moisture source first.
Is it safe to keep food in a cupboard with mould?
I would not. Throw away open and porous packaging from a mouldy cupboard and wash intact tins and crockery before use. I will not give medical advice, so ask a doctor if you have a health concern.
Will mould come back after I clean it?
It will if the moisture source is still there. A dry cupboard with a repaired joint, a gap at the back and sensible ventilation usually stays clean.